
Hello hello! It’s DIY time again! 🙂
Did you like last week’s All-Natural Aftershave DIY? This week Claire and I teamed up again to bring you a scrummy Myrrh & Palmarosa Lip Balm. It turns out lip balm is actually pretty easy to make! And this stuff is all-natural, with no icky ingredients – yay! And like the Aftershave, we’ve used some beautiful essential oils to make it smell heavenly.
I can imagine making these for little girls and grown-up girls alike, I mean… who doesn’t love pretty-smelling cosmetics? 🙂
To get the most out of these lovely lip balms, we asked herbalist Alina, from Abundant Earth, to tell us which essential oils would be the most beneficial for our lips. She recommended that we use Myrrh and Palmarosa Essential oils, which will give a very soft rose scent. YUM! And as an added extra, both these oils have health benefits! Myrrh, treasured for its spiritual significance, heals dried, cracked lips, and makes them super soft. Palmarosa moisturises the lips, and gives a soft, rose-like aroma. Cool huh!
So let’s get started, shall we?
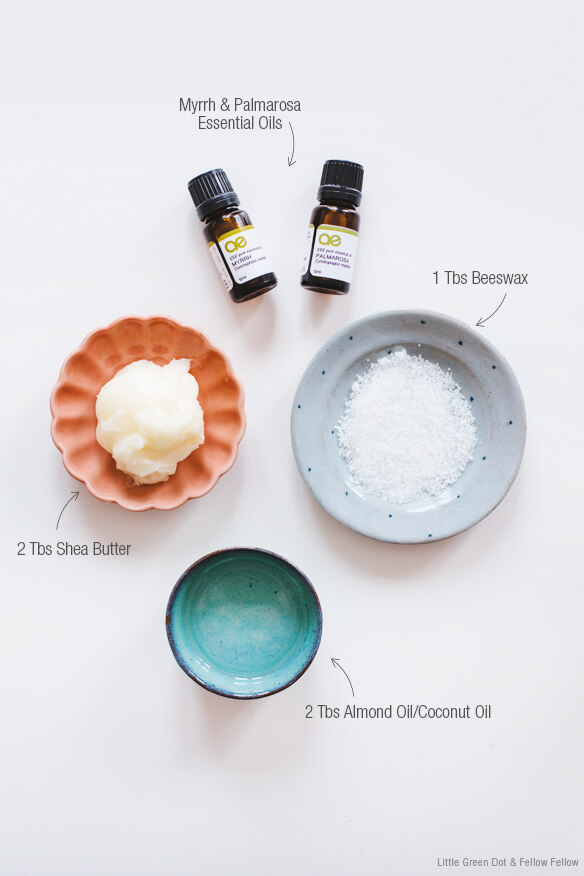
Here’s what you’ll need:
– 2 Tbs Shea Butter
– 2 Tbs Almond or Coconut Oil
– 1 Tbs Beeswax (the natural-coloured beeswax is fine too)
– 2 drops Myrrh Essential Oil
– 3 drops Palmarosa Essential Oil
– Small bowl & burner (we used a small ceramic bowl and candle, a small saucepan on the stove would also work)
– Small jug
– Small empty lip balm pots (or repurpose little jars)
Step 1.
Put the Shea Butter, Beeswax, Almond/Coconut Oil, and Essential Oils into the bowl above your lit burner. If you’re using the stove, make sure it’s on very low, and always keep an eye on it.
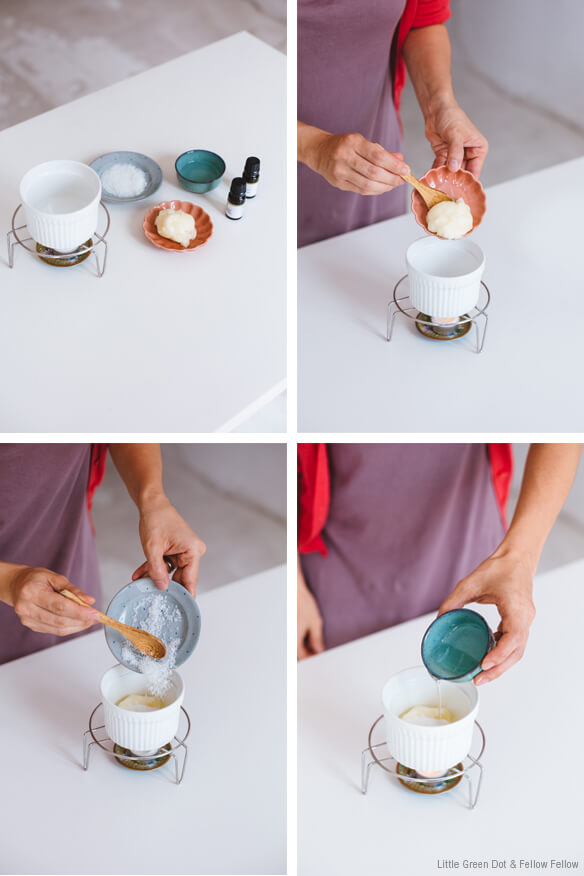 Step 2.
Keep an eye on the mixture and gently stir every now and then until everything is melted and it becomes clear. It should never boil, just gently melt. Be very careful when handling the pot/saucepan as it will be hot.
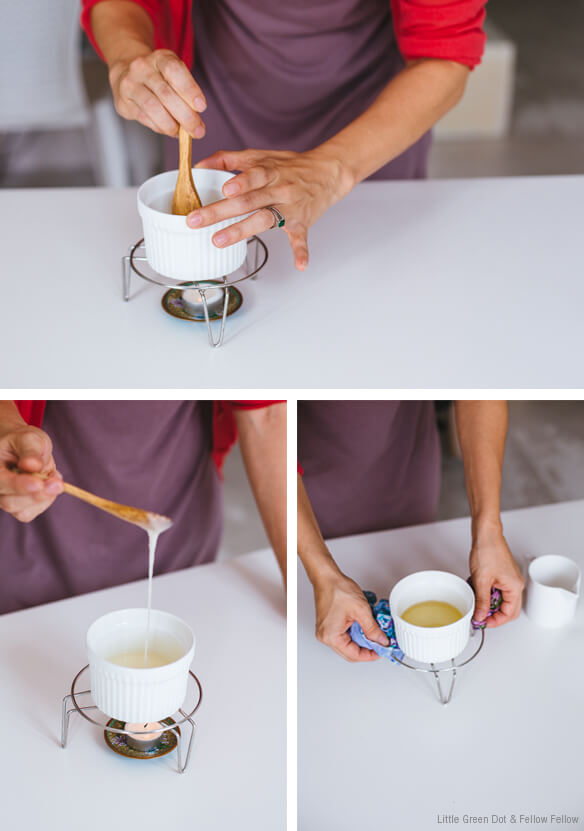
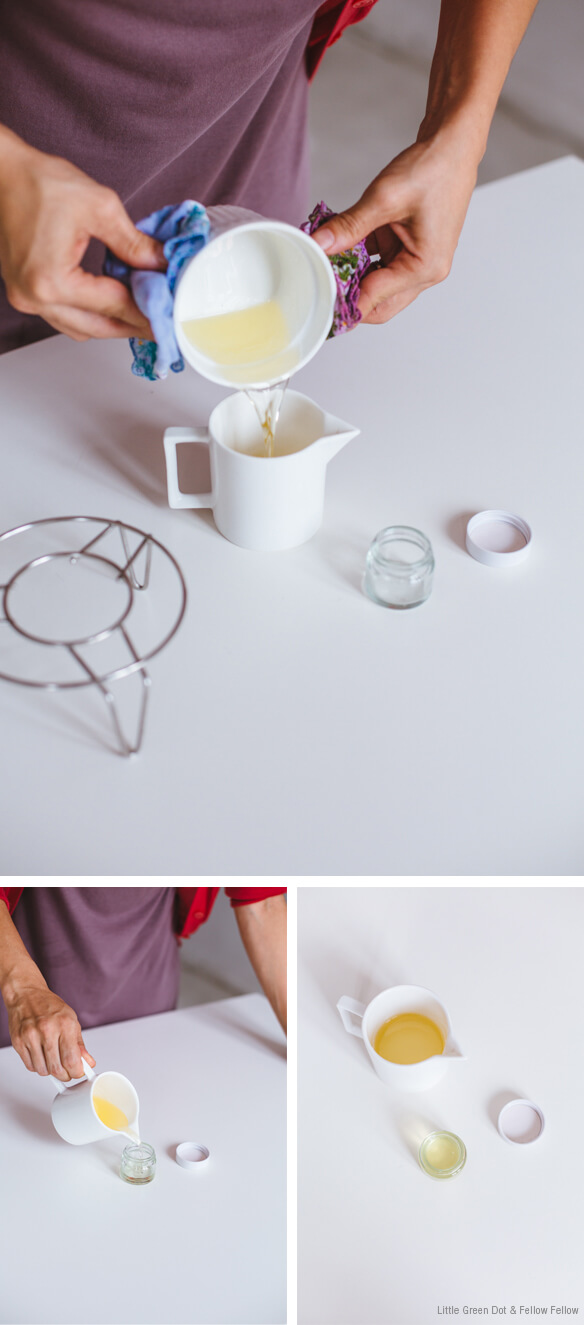
Step 3.
Using a dry cloth to hold the bowl if it’s hot, transfer the melted mixture into a small jug. Then use the small jug to fill the lip balm pots. This amount of mixture was enough to fill 2 small pots.
 Step 4.
Leave the lip balm to set. Once it’s opaque and solid, you’re good to go! Seal it up and get to thinking about how you’re going to decorate the jar…
Head over to Fellow Fellow and scroll to the bottom to get your free printables!
Claire created some lovely black and white labels for you to download and use to decorate your lip balms. Once you’ve downloaded the file you need (A4 or Letter) you’ll noticed that there are two pages – one with the labels the right way around, the other with the labels in reverse.
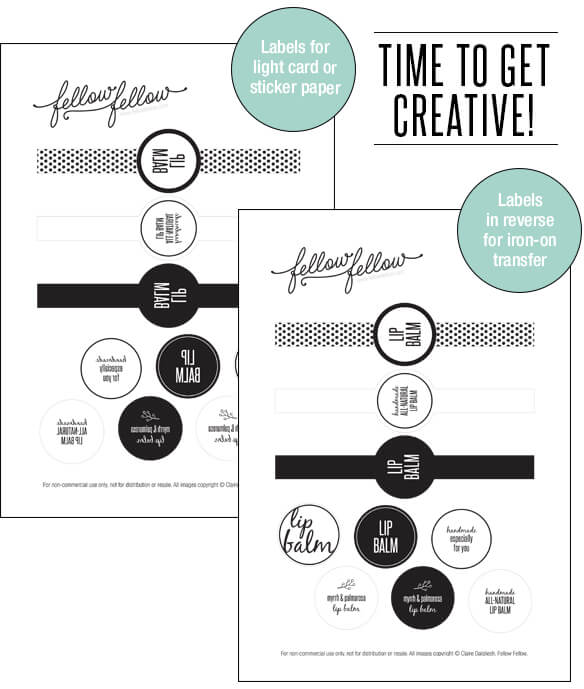 Page one: Labels the right way around – Print on sticker paper.
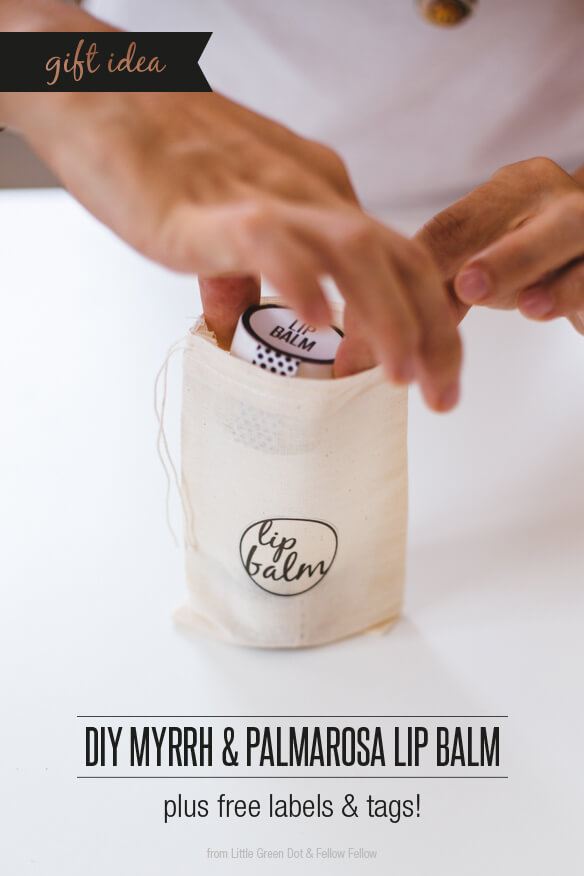
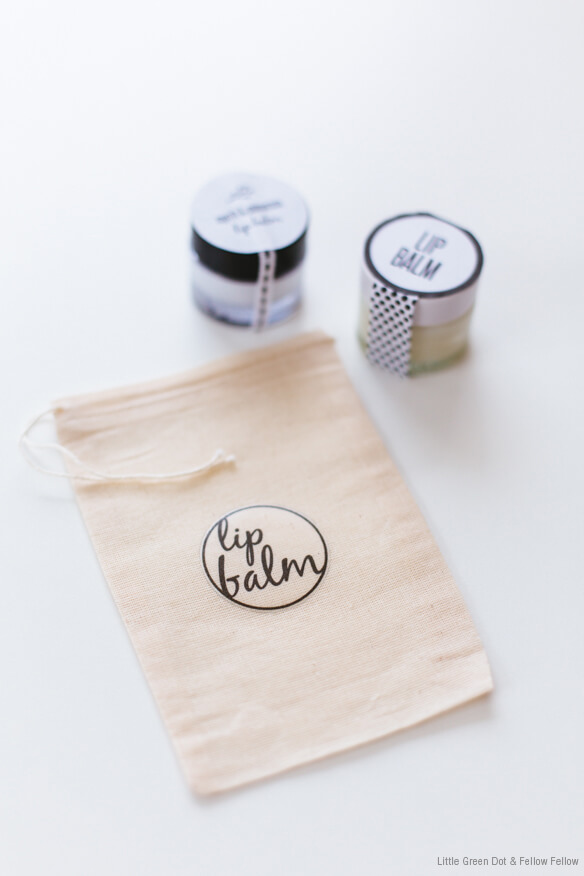
Page two: Labels in reverse – Below you’ll see some cute little gift bags we created to package the Lip Balms in, and for this you’ll need Iron-On transfer paper, and the reversed labels.
Here’s how we decorated our two pots of Lip Balm – feel free to get creative though, we’ve included lots of different labels so you can have fun with it!
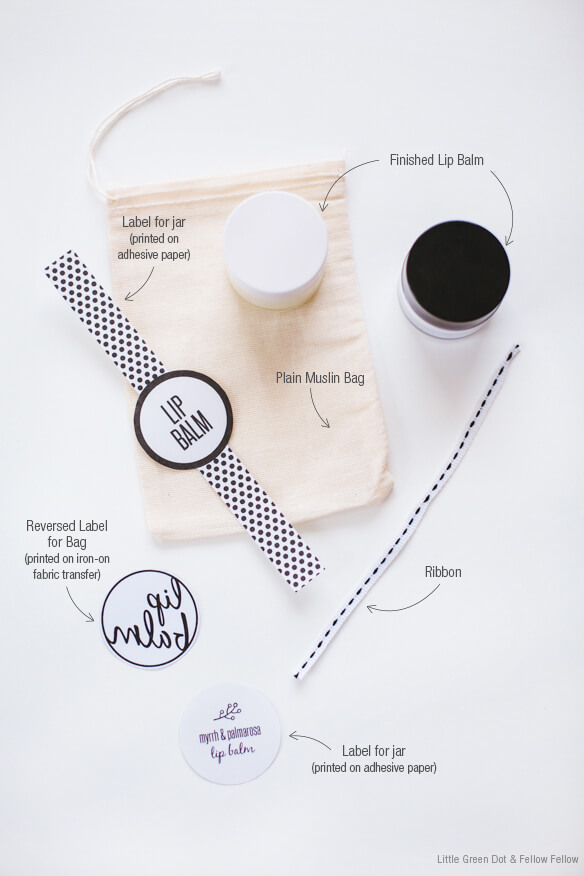
You’ll need:
– Finished and cooled Lip Balms, sealed
– Plain Muslin Bag
– Ribbon
– Tape
– A printed sheet of labels (the right way around) on sticker paper. Cut out the ones you want.
– A printed sheet of the reversed labels on Iron-on Transfer paper. Cut out ones you want to use according to packet instructions.
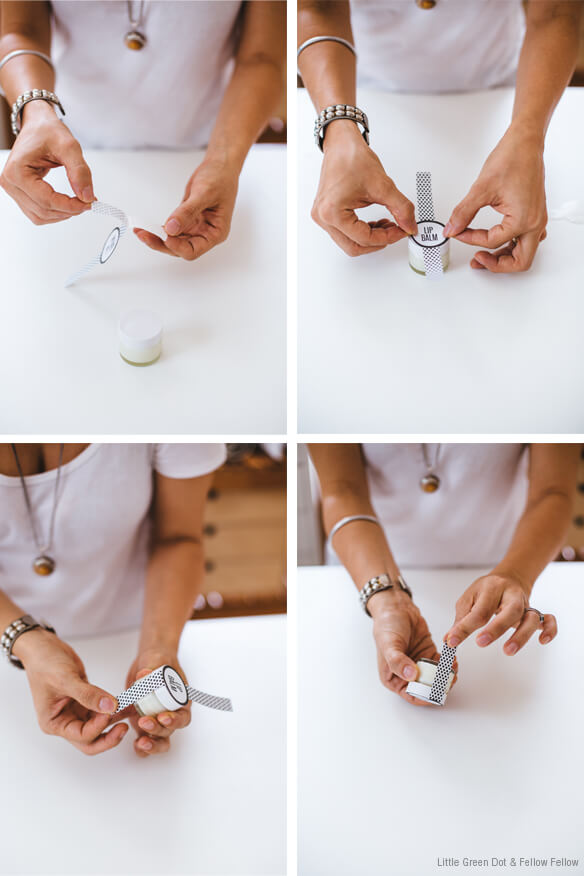
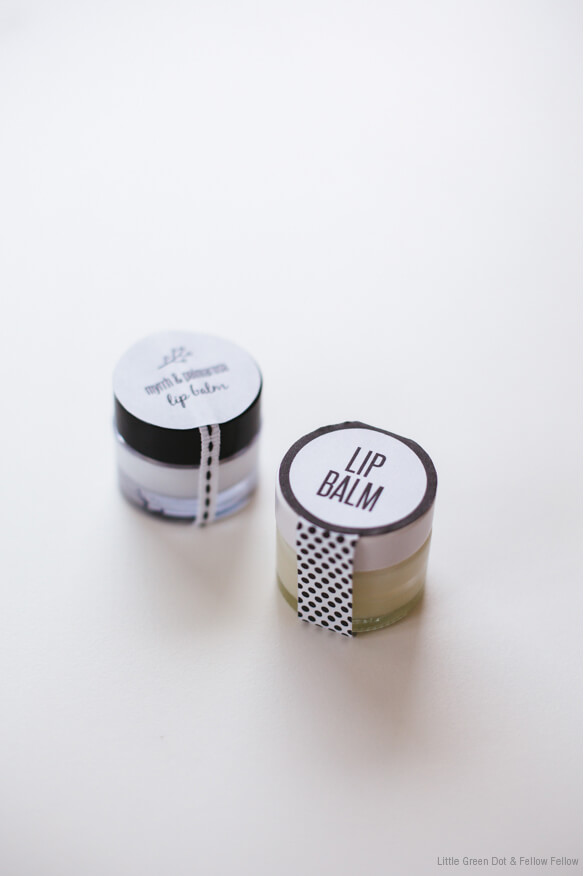
JAR 1:
We decided to use one of the full-jar stickers, so start by peeling off the backing, then position the circle part over the jar lid and stick down. The wrap the two arms around the jar and secure on the bottom.
 JAR 2:
For jar 2 we wanted to use some ribbon. Start by measuring out and cutting some ribbon, wrap it around the jar and secure the ends on the bottom of the jar with tape. Cut out one of the round stickers and peel off the backing. Stick it on top of the lid, over the ribbon.
 That’s it!
To make a gift bag to package your new lip balms in, cut out the labels you want from the ones you printed on the Iron-On Transfer Paper. Iron them onto the muslin bag according to the packet instructions.
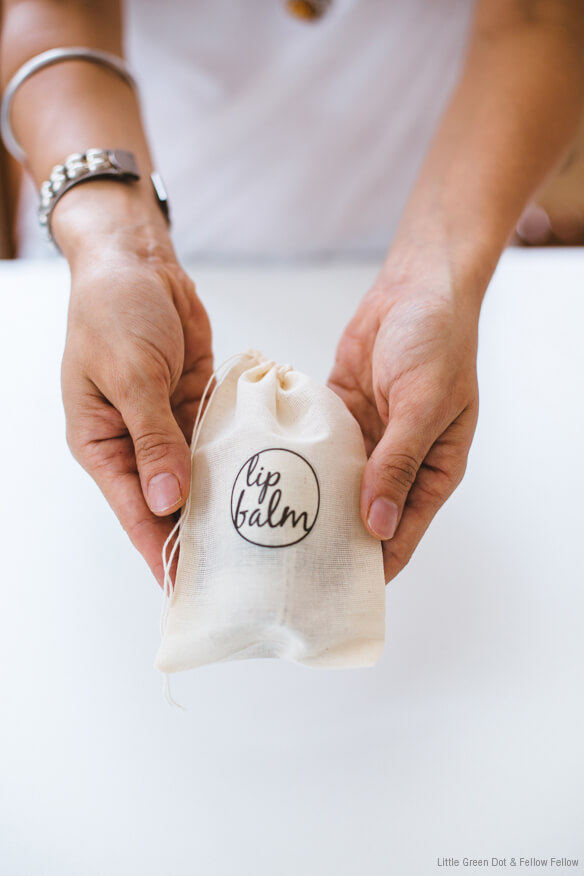
Doesn’t it look great?! I’m sure it’d be well-received if you were to make these for someone special 🙂
Thank you again to Claire for teaming up with me on these lovely DIYs! Be sure you check out her blog for loads more craft and design ideas, inspiration and how-to’s!
10 responses to “Handmade Christmas for Her”
The lip balm xan u add something in it to give it cor for your lips?
Hi Tonya,
I haven’t played with color yet – you’d need something that is soluble in oil. You wouln’t want to add anything that contains water.. so maybe a powdered color (like powdered beet root) or a food color that is glycerine based.
let us know what you come up with! 🙂
can you share where to buy the materials?
– iron on paper
– adhesive paper
– muslin bag
In your future posts, it might be good if you can share these information so it makes it easier for us. Thank you.
Hi, would you able able to tell me where you bought the glass jars from? Thanks!
Hi Danelle!
Are you in Singapore? I got them from http://www.medtra.com.sg
may i know where you get your beeswax from? I bought mine here in singapore and it was in yellow pellets.
thank you 🙂
Hi! I get my beeswax from iHerb, but they only sell it in a white form for cosmetic use. Yellow is better as it’s less processed – they make it white and remove the honey scent, so that it doesn’t affect the final color or smell of your product. To be honest, I prefer the natural yellow beeswax especially to make candles with, but it’s harder and more expensive sometimes to come by in Singapore
iHerb link: http://www.iherb.com/frontier-natural-products-white-beeswax-beads-16-oz-453-g/30793?rcode=CPF766
Do share with us where you buy it from too! 🙂
The small jug looks really nice and practicable. May I know where you’ve got yours please?
Hi there, this looks really great! I apply lip balm several times a day so I would really want to DIY it and go natural. But how long are they good for in Singapore’s weather? Do they store better if I keep batches in the fridge before use? I’m afraid it may go bad if I bring them around and put in my bag etc
Hi Winnie – it holds up well – you don’t need to worry about spoilage, because theres no water in the recipe, it lasts for ages!! Hope that you give it a try!